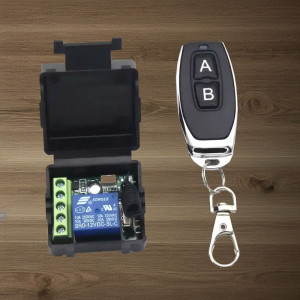
Wireless controlled relay for triggering alarm accessories
Controlled in 433 MHz by the Euro Security Protect control panel
Activation by remote control
12V power supply
5 switching modes
Triggering of:
Sirens
Fog generators
Active sound barriers
Light devices
Magnetic locks
Any domestic appliance powered by 12 or 230V
This relay switch can be controlled:
with a remote control (2 provided)
by the Euro Security Protect alarm panel
by a motion detector, door opening detector, smoke or gas detector
It allows triggering one or more security devices such as sirens, fog generators, active sound barriers, light devices, or simply domestic appliances.
Triggering can occur when an alarm is detected by the control panel. It can also be triggered manually with a remote control. Finally, triggering can be scheduled at programmed times on the control panel.
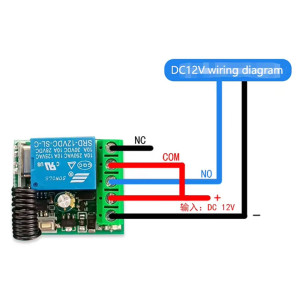
The relay block must be powered by 12V DC. It can switch voltages from 5V to 30V DC, and from 125 to 250V AC, as long as the current does not exceed 10A. It can also be used as a dry contact, for example with fog generators that don't require trigger voltage.
The relay has 5 modes:
Real-time: The relay is activated only while the remote control button is pressed. It is deactivated when the button is released.
Self-locking: One pulse activates the relay. A second pulse deactivates it.
Interlocking: On the remote control, button A activates the relay, button B deactivates it. This mode is most common when the relay is used with the control panel. In case of alarm, the control panel triggers the relay and deactivates it when disarmed. Use this mode for one or more sirens, disorientation light devices, or magnetic locks.
5-second activation: Pressing the remote control button will activate the relay for 5 seconds. Used with the control panel, this mode allows triggering of devices activated on rising edge, such as sound barriers, smart sirens activated by single pulse, and fog generators.
10-second activation: Pressing the remote control button will activate the relay for 10 seconds.
15-second activation: Pressing the remote control button will activate the relay for 15 seconds.
20-second activation: Pressing the remote control button will activate the relay for 20 seconds.
Remote Control Pairing
Real-time Mode
Press the learning button
The LED indicator flashes once then stays lit
Press the button on the remote control to pair
The LED indicator flashes 3 times to confirm
Self-locking Mode
Press the learning button twice
The LED indicator flashes twice then stays lit
Press the button on the remote control to pair
The LED indicator flashes 3 times to confirm
Interlocking Mode
Press the learning button 3 times
The LED indicator flashes 3 times then stays lit
Press button "A" on the remote control
The LED indicator flashes 3 times
Press button "B" on the remote control
The LED indicator flashes 3 times to confirm
5-second delay Mode
Press the learning button 4 times
The LED indicator flashes 4 times then stays lit
Press the button on the remote control to pair
The LED indicator flashes 3 times to confirm
10-second delay Mode
Press the learning button 5 times
The LED indicator flashes 5 times then stays lit
Press the button on the remote control to pair
The LED indicator flashes 3 times to confirm
15-second delay Mode
Press the learning button 6 times
The LED indicator flashes 6 times then stays lit
Press the button on the remote control to pair
The LED indicator flashes 3 times to confirm
20-second delay Mode
Press the learning button 7 times
The LED indicator flashes 7 times then stays lit
Press the button on the remote control to pair
The LED indicator flashes 3 times to confirm
Clearing Codes
Hold the learning button for 5 seconds
All paired devices will be cleared.
Pairing with the control panel in interlocking mode (sirens, lights, and magnetic locks)
On the control panel, click Menu, Accessories, then Alarm socket
Press the relay pairing button 3 times. The LED indicator flashes 3 times then stays lit
Click the left icon on the control panel (ON)
The LED indicator flashes 3 times
Click the right icon on the control panel (OFF)
The LED indicator flashes 3 times. Pairing is complete
Pairing with the control panel in 5-second delay mode (sound barrier, smart siren activated by pulse, fog generator)
On the control panel, click Menu, Accessories, then Alarm socket
Press the relay pairing button 4 times. The LED indicator flashes 4 times then stays lit
Click the left icon on the control panel (ON)
The LED indicator flashes 3 times
Click the right icon on the control panel (OFF)
The LED indicator flashes 3 times. Pairing is complete
Technical specifications of the wireless gas detector
Power supply
12V DC
Switching
dry contact or voltage from 5 to 30V DC, 125 to 250V AC, 10A max
Communication
Wireless, 433.92 MHz
Remote control
2 buttons, 433.92 MHz (2 pieces provided)
Case dimensions
40 x 40 x 25 mm
Weight
80 grams
Certifications
CE, RoHS
chat
Comments (0)
No customer reviews for the moment.
error
Your review appreciation cannot be sent
feedback
Report comment
Are you sure that you want to report this comment?
check_circle
Report sent
Your report has been submitted and will be considered by a moderator.
error
Your report cannot be sent
Write your review
check_circle
Review sent
Your comment has been submitted and will be available once approved by a moderator.
error
Your review cannot be sent
Viewed products
Wireless controlled relay for triggering alarm accessories
Controlled in 433 MHz by the Euro Security Protect control panel